Over 80% of gardeners lose seedlings to cutworms each spring, but you can stop this devastating pest tonight with simple barriers and targeted treatments. These nocturnal caterpillars hide in soil during the day and emerge after dark to chew through tender stems at ground level. You’ll discover proven methods using cardboard collars, diatomaceous earth, and organic sprays that protect your plants immediately without harmful chemicals.
Key Takeaways
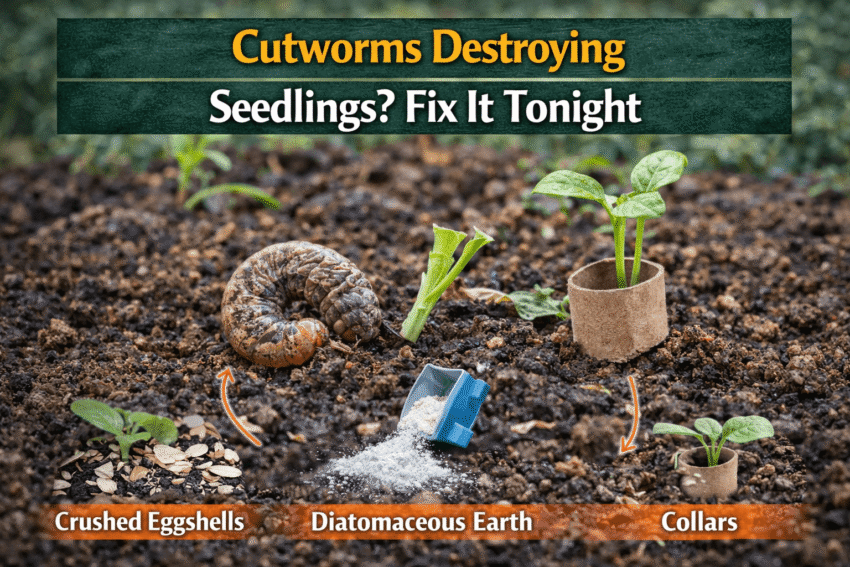
- Cutworms attack seedlings at night by chewing through stems at soil level, causing plants to topple over by morning. Create physical barriers using cardboard collars, toilet paper rolls, or aluminum foil wrapped around the base of each seedling to block their access.
- Hand-picking cutworms after dark provides immediate control since these caterpillars feed actively at night. Check your garden with a flashlight, dig around damaged plants, and remove the pests you find hiding just below the soil surface.
- Diatomaceous earth sprinkled in a circle around seedlings creates a protective barrier that damages cutworm bodies as they crawl across it. Apply this natural powder in the evening and reapply after rain or watering to maintain effectiveness.
Identifying the Culprit: Recognizing Cutworm Damage
Your seedlings will show distinctive damage patterns that set cutworm attacks apart from other garden pests. Clean cuts near the soil line indicate cutworm feeding, while entire plants may topple overnight. You’ll often find wilted seedlings lying on the ground with their stems completely severed, creating a frustrating scene in your garden beds.
Visual Signs on Severed Stems
Examine the stem cuts closely to confirm cutworm activity. Smooth, angled cuts at ground level are telltale signs of these nocturnal feeders. Some stems show partial chewing damage, while others appear completely sheared off. You might notice the damaged plants are concentrated in specific areas rather than randomly scattered.
Distinguishing Cutworms from Other Soil Pests
Cutworms leave characteristically clean cuts unlike the ragged damage from slugs or beetles. Grubs create different symptoms, typically causing plants to yellow and wilt gradually. Cutworm damage happens overnight with stems severed cleanly, while wireworms tunnel through roots and cause slower decline.
You can separate cutworm damage from other pest problems by checking several key indicators. Slugs leave silvery slime trails and create irregular holes in leaves rather than cutting stems. Root maggots cause plants to wilt without visible stem damage, while cutworms consistently target the stem base within two inches of soil level. Dig around damaged plants during daylight hours to find the C-shaped, plump larvae hiding just below the surface. These caterpillars curl up when disturbed, unlike grubs which remain straight, and they feel soft compared to the harder-bodied wireworms that cause similar wilting symptoms.
Environmental Factors Promoting Infestation
Your garden’s environment plays a direct role in attracting cutworm moths and supporting larval development. Moist soil conditions, abundant plant debris, and moderate temperatures create ideal breeding grounds for these destructive pests. Dense vegetation and weedy areas near your seedlings provide perfect hiding spots during daylight hours. The combination of these factors can transform your garden into a cutworm haven overnight.
- Excessive moisture in soil
- Thick layers of organic mulch
- Overgrown weeds and grass
- Cool spring temperatures (50-70°F)
- Poor garden sanitation
Soil Composition and Organic Debris
Heavy clay soils that retain moisture longer attract female cutworm moths seeking egg-laying sites. Your decomposing plant matter, fallen leaves, and thick mulch layers provide both food and shelter for emerging larvae. Compacted soil with poor drainage creates the damp conditions these pests prefer. The presence of uncleared crop residue from previous seasons significantly increases infestation risk.
Impact of Seasonal Weather Patterns
Mild winters allow more cutworm pupae to survive underground until spring. Your garden faces increased pressure when early spring rains combine with warming soil temperatures between 50-70°F. The timing of these weather conditions directly correlates with peak cutworm activity.
Cool, damp springs trigger mass cutworm emergence just as you’re transplanting vulnerable seedlings. Extended periods of overcast weather encourage these nocturnal feeders to remain active longer during early morning hours, causing more damage. Your region’s frost dates and temperature fluctuations determine when adult moths begin laying eggs in your garden beds. Drought conditions following wet periods can actually drive cutworms toward your irrigated garden areas where moisture remains consistent. Climate patterns that produce multiple generations per season-common in warmer zones-create waves of infestation throughout the growing period.
How to Immediate Nighttime Intervention
Darkness brings cutworms out to feed, making nighttime the perfect opportunity to catch these pests in action. Armed with a flashlight, you can spot them actively chewing through your seedlings and take immediate control measures that will save your garden tonight.
Scouting and Manual Removal Techniques
Shine your flashlight directly at the soil line where stems meet the ground. Cutworms hide just beneath the surface or curl around plant bases during feeding. Pick them off by hand and drop them into soapy water for instant elimination.
Deploying Protective Collars for Instant Safety
Cardboard tubes, plastic cups with bottoms removed, or aluminum foil create physical barriers that stop cutworms immediately. Push collars two inches into soil and leave three inches above ground around each vulnerable seedling.
Your homemade collars work because cutworms are surface crawlers that won’t burrow deep to bypass barriers. Toilet paper rolls cut in half provide two protective sleeves per tube, while yogurt containers offer sturdier long-term protection. Install these barriers tonight and your seedlings will be safe by morning. The collars remain effective for 2-3 weeks, giving young plants time to develop woody stems that cutworms can’t cut through. You can remove them once stems thicken beyond a pencil’s width, though leaving them in place causes no harm to plant growth.
Expert Tips for Physical Deterrents
Physical barriers offer immediate protection against cutworm attacks on your vulnerable seedlings. You can implement several effective methods using materials already available in your home or garden shed. Collars made from cardboard, plastic cups, or aluminum foil create impenetrable walls around plant stems. This approach works best when installed at planting time.
Utilizing Diatomaceous Earth Effectively
Sprinkle food-grade diatomaceous earth in a circle around each seedling’s base to create a protective barrier. The microscopic sharp edges cut through cutworm bodies, causing dehydration and death within hours. Reapply after rain or heavy watering to maintain effectiveness. This natural solution remains safe for pets and beneficial insects.
Creating Barriers with Household Materials
Cardboard toilet paper rolls cut into 2-3 inch sections serve as excellent protective collars when pushed halfway into soil. Plastic bottles with tops and bottoms removed work equally well for larger seedlings. Paper cups with bottoms removed provide sturdy, disposable options. This method costs nothing and delivers instant results.
You’ll find the most success by installing these barriers before cutworms become active at night. Push each collar at least one inch below soil level and extend two inches above ground to prevent worms from climbing over. Empty tin cans with both ends removed make particularly durable barriers that last multiple seasons. Avoid leaving gaps between the collar and stem where small cutworms might squeeze through. Check your barriers weekly for damage or displacement, especially after storms or strong winds that might shift the protective materials.
Garden Hygiene and Strategic Tilling
Removing plant debris and weeds eliminates cutworm hiding spots and egg-laying sites. Till your soil in fall to expose larvae and pupae to freezing temperatures and predators. You’ll disrupt their life cycle by cultivating two weeks before planting, which brings cutworms to the surface where birds can eat them.
Crop Rotation and Habitat Management
Rotating your crops annually prevents cutworm populations from establishing in specific areas. Avoid planting susceptible seedlings where grassy areas or cover crops grew previously. Beneficial insects thrive when you maintain diverse plantings and minimize broad-spectrum pesticides throughout your garden.
Strategic crop rotation works because cutworms prefer certain plant families and soil conditions. When you change plant locations each season, you break the pest’s reproductive cycle and reduce soil-borne larvae populations. Your garden benefits most when you wait at least two years before replanting the same family in a given spot. Ground beetles, parasitic wasps, and birds naturally control cutworm numbers when you provide them with permanent habitat areas like native plant borders, mulched pathways, and undisturbed perennial beds. These predator zones should border your vegetable beds to maximize their protective effect. You can enhance this biological control by avoiding soil disturbance during peak predator activity periods in spring and early summer.
Summing up
Presently, you have multiple effective methods to protect your seedlings from cutworm damage tonight. Collars made from cardboard or plastic create immediate barriers around plant stems. Diatomaceous earth and beneficial nematodes offer organic control solutions. Hand-picking cutworms after dark provides instant results. You can combine these strategies for maximum protection, ensuring your garden thrives without these destructive pests threatening your young plants.
FAQ
Q: How can I tell if cutworms are actually the pests destroying my seedlings?
A: Cutworms leave distinct signs that set them apart from other garden pests. You’ll find seedlings cut off cleanly at soil level, as if someone used scissors on the stems. The severed plants typically lie on the ground near where they were growing. Check your garden at night with a flashlight to spot the culprits in action-these gray, brown, or black caterpillars curl into a C-shape when disturbed. Dig gently around the base of damaged plants during daytime, and you’ll often find cutworms hiding just beneath the soil surface within a few inches of their latest victim.
Q: What’s the fastest way to protect my seedlings from cutworms tonight?
A: Create physical barriers around each seedling using materials you likely have at home. Cut toilet paper rolls or paper cups into 2-3 inch sections and place them around your plants, pushing them about an inch into the soil. Aluminum foil wrapped loosely around stems works equally well. Cardboard collars from cereal boxes provide another effective option. These barriers prevent cutworms from reaching the tender stems they target. You can also hand-pick the pests after dark when they emerge to feed-drop them into soapy water to eliminate them. Sprinkle crushed eggshells or coffee grounds in a ring around plants as an abrasive deterrent that makes it uncomfortable for cutworms to crawl across.
Q: Will cutworms continue to be a problem throughout the growing season?
A: Cutworm damage typically peaks in spring and early summer when seedlings are most vulnerable. The pests cause the most destruction during their larval stage, which lasts 3-4 weeks before they pupate and transform into moths. Your plants become less susceptible once stems develop tougher, woody tissue that cutworms can’t easily cut through. Most seedlings reach this safer stage within 3-4 weeks of transplanting. The adult moths don’t damage plants-they focus on laying eggs for the next generation. Fall gardeners may encounter a second wave of cutworms, but mature plants established earlier in the season rarely suffer significant harm from these late-season larvae.