Most gardeners discover thrips damage too late, when silvery streaks and distorted leaves already plague their plants. These tiny insects feed on plant tissues and spread diseases rapidly through your garden. You need to act quickly to protect your plants from permanent damage. This guide shows you proven methods to identify thrips and eliminate them using effective treatments that work fast.
Key Takeaways
- Thrips are tiny insects that damage plants by piercing leaves and sucking out cell contents, leaving behind silvery streaks, black spots, and distorted growth that can stunt your plant’s development if left untreated.
- Natural control methods work effectively against thrips, including spraying plants with neem oil or insecticidal soap, introducing beneficial insects like ladybugs and lacewings, and using sticky traps to monitor and reduce adult populations.
- Prevention is your best defense against future infestations-inspect new plants before bringing them home, maintain proper air circulation, remove dead plant material regularly, and quarantine any affected plants to stop thrips from spreading to healthy specimens.
Identifying Thrips: Key Factors and Signs
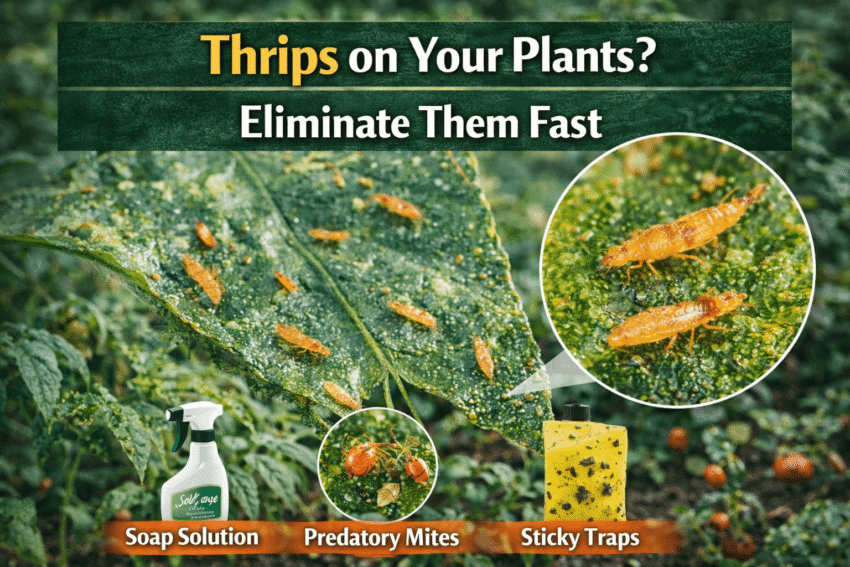
Thrips are tiny, slender insects that measure just 1-2mm in length, making them difficult to spot with the naked eye. You’ll need to look closely at your plant’s leaves and flowers to detect their presence. Key signs include:
- Tiny elongated insects with fringed wings
- Silver or bronze streaking on leaf surfaces
- Black dots (fecal matter) on foliage
- Distorted or discolored new growth
Assume that if you notice any combination of these symptoms, thrips have already established a population on your plants.
Physical Characteristics and Life Cycle
Adult thrips appear as narrow, dark-colored insects with feathery wings, though some species are lighter yellow or brown. Their life cycle progresses rapidly from egg to adult in just two to three weeks under warm conditions. Females insert eggs directly into plant tissue, making early detection challenging. Your plants can host multiple generations simultaneously during peak growing seasons.
Recognizing Silvering and Black Fecal Specks
Silvering occurs when thrips puncture plant cells and drain their contents, leaving behind empty tissue that reflects light. Black specks appear as tiny dots scattered across affected leaves and are actually thrips excrement. Assume that both symptoms together confirm active thrips feeding on your plants.
The silvery appearance develops because thrips use their rasping mouthparts to scrape leaf surfaces rather than piercing them cleanly. This feeding method destroys chlorophyll-containing cells, creating a distinctive stippled or streaked pattern that progresses from light silver to bronze as damage worsens. You’ll typically find the black fecal deposits concentrated near feeding sites, often along leaf veins or on the undersides where thrips prefer to hide. Heavy infestations cause extensive silvering that can cover entire leaves, severely impacting photosynthesis and weakening your plant’s overall health.
Factors That Encourage Thrip Infestations
Several environmental conditions create the perfect breeding ground for thrips to multiply rapidly on your plants. Warm temperatures combined with dry air accelerate their reproduction cycle dramatically. Poor plant health weakens natural defenses against these pests. Overcrowded growing spaces limit air circulation, creating ideal hiding spots. Assume that any combination of these factors increases your risk of severe infestation.
- High temperatures between 70-85°F
- Low humidity levels below 40%
- Stressed or weakened plants
- Excessive nitrogen fertilization
- Poor air circulation
- Dense plant canopies
Impact of Temperature and Low Humidity
Thrips thrive in hot, dry conditions that stress your plants while accelerating pest development. Your greenhouse or indoor garden becomes a thrip paradise when humidity drops and temperatures rise. These pests complete their life cycle in just two weeks under optimal conditions, producing multiple generations quickly.
| Temperature Range | Thrip Activity Level |
| Below 60°F | Minimal activity, slow reproduction |
| 70-85°F | Peak activity, rapid breeding |
| Above 95°F | Reduced activity, plant stress increases |
| Humidity below 40% | Optimal for thrip survival |
| Humidity above 60% | Slows reproduction rate |
Plant Stress and Over-Fertilization Risks
Weakened plants become easy targets for thrip attacks because their natural defense mechanisms fail under stress. Your excessive nitrogen application creates tender, succulent growth that attracts these pests like a magnet. Drought, root damage, and nutrient imbalances all compromise plant immunity against infestations.
Nitrogen-heavy fertilizers produce lush foliage with thin cell walls that thrips pierce effortlessly. Your plants may look green and vigorous, but this rapid growth lacks the structural strength to resist feeding damage. Balanced nutrition with adequate phosphorus and potassium helps your plants develop thicker leaves and stronger cellular defenses. Water stress compounds the problem by reducing the plant’s ability to produce protective compounds. You’ll notice thrips preferentially attack the newest growth where tissues are most vulnerable and nutrient-rich.
How to Inspect Your Plants for Early Detection
Regular inspection of your plants helps you catch thrips infestations before they spiral out of control. Check the undersides of leaves, new growth, and flower buds where these pests prefer to hide. Look for silvery streaks, black fecal spots, or tiny moving insects that signal an active infestation.
Utilizing Blue and Yellow Sticky Traps
Sticky traps serve as excellent early warning systems for thrips activity in your garden. Place yellow or blue traps near susceptible plants at canopy height to monitor adult thrips populations. You’ll quickly identify problem areas and gauge the severity of your infestation through trap counts.
The White Paper Shake Method
Hold a white sheet of paper beneath suspect leaves and tap the foliage firmly several times. Thrips will fall onto the paper where their dark bodies become visible against the white background, making identification simple and immediate.
This diagnostic technique works best during morning hours when thrips are most active on plant surfaces. Examine the paper closely after shaking, looking for tiny elongated insects that may start crawling across the surface. You can repeat this test on multiple plants throughout your garden to map out which areas need treatment. The method requires no special equipment and provides instant results, making it your go-to option for quick field assessments. Perform this check weekly during growing season to stay ahead of potential outbreaks.
How to Eliminate Thrips Using Mechanical Methods
Mechanical control methods offer you immediate, chemical-free solutions for managing thrip infestations. Physical removal techniques work best when you catch the problem early, allowing you to reduce pest populations without introducing synthetic substances to your garden. These hands-on approaches give you direct control over the elimination process.
Isolation and Targeted Pruning Techniques
Quarantine infected plants immediately to prevent thrips from spreading to healthy specimens. Remove heavily infested leaves, stems, and flowers using sterilized pruning shears, then dispose of the material in sealed bags. This method reduces thrip populations while removing their primary feeding and breeding sites.
High-Pressure Water Rinsing Procedures
Direct a strong stream of water at leaf undersides, stems, and flower buds where thrips hide. Repeat this treatment every two to three days for two weeks to dislodge adults, larvae, and eggs from plant surfaces.
Your garden hose with a spray nozzle set to jet mode works perfectly for this technique. Target the areas between leaf veins and along stems where thrips congregate in clusters. Early morning applications allow plants to dry throughout the day, preventing fungal issues. This method proves especially effective for outdoor plants and sturdier houseplants that can withstand the water pressure. Delicate specimens may require a gentler spray setting to avoid damaging tender foliage.
Expert Tips for Biological and Chemical Control
Combining biological predators with targeted chemical treatments gives you the most effective thrips management strategy. Your approach should prioritize natural enemies first, then supplement with organic or synthetic options when populations exceed acceptable thresholds. Consider these key methods:
- Release beneficial insects during early infestation stages
- Apply chemical controls during evening hours to protect pollinators
- Rotate between different product types to prevent resistance
- Monitor plant health weekly to adjust treatment intensity
Knowing which control method suits your specific situation determines your success rate.
Introducing Predatory Mites and Lacewings
Beneficial insects offer sustainable, long-term thrips suppression without chemical residues. Amblyseius cucumeris and Neoseiulus cucumeris mites actively hunt thrips larvae, while green lacewings consume both adults and juveniles. Release these predators when you first notice thrips activity, maintaining temperatures between 60-80°F for optimal effectiveness. Your plants benefit from continuous protection as these beneficial species establish colonies.
Applying Neem Oil and Spinosad Effectively
Organic insecticides provide powerful thrips control when biological methods need reinforcement. Spray neem oil or spinosad solutions thoroughly on leaf undersides where thrips hide and feed. Apply treatments every 5-7 days until you see complete elimination of active infestations. Your timing matters-treat during cooler morning or evening hours.
Proper application technique maximizes the effectiveness of these organic solutions. Dilute neem oil according to label instructions, typically 2 tablespoons per gallon of water, and add a few drops of dish soap to improve coverage. Spinosad works best when applied to dry foliage, requiring direct contact with thrips to achieve lethal results. You should avoid spraying during flowering periods to protect beneficial pollinators visiting your garden. Test any new product on a small leaf section first to check for phytotoxicity, especially on sensitive plant varieties. Reapplication becomes necessary after rain or overhead watering washes away the protective coating.
Preventive Strategies for Long-Term Protection
Keeping thrips away permanently requires consistent preventive measures rather than reactive treatments. Your garden needs a multi-layered defense system that addresses both environmental conditions and physical barriers. Regular monitoring combined with proactive strategies will save you time and protect your plants from future infestations.
Maintaining Soil Health and Garden Hygiene
Healthy soil produces stronger plants that naturally resist thrips attacks. Remove plant debris, fallen leaves, and weeds regularly since these provide perfect hiding spots for overwintering thrips. Sterilize your gardening tools between uses and quarantine new plants for two weeks before introducing them to your garden.
Implementing Reflective Mulches and Fine Mesh
Reflective aluminum or silver polyethylene mulches confuse thrips and reduce landing rates by up to 70%. Install fine mesh screens with openings smaller than 0.2mm around vulnerable plants to create physical barriers. These materials work together to disrupt thrips’ visual cues while blocking their access.
Reflective mulches work by bouncing UV light upward, which disorients flying thrips and prevents them from recognizing your plants as suitable hosts. You’ll want to lay these mulches around the base of susceptible plants during peak thrips season, typically spring through early fall. Fine mesh netting serves as your second line of defense, particularly effective for protecting seedlings and high-value crops. The mesh allows air, light, and water to pass through while keeping adult thrips from reaching plant surfaces to feed or lay eggs. Combining both methods creates an inhospitable environment that significantly reduces thrips populations without chemical intervention. Your investment in these materials pays off through multiple growing seasons since both are reusable and durable.
Conclusion
Following this comprehensive guide, you can protect your plants from thrips damage effectively. Quick identification and immediate action are your best defense against these persistent pests. You have multiple treatment options available, from natural remedies like neem oil to chemical solutions for severe infestations. Regular monitoring and preventive measures will keep your garden healthy and thrip-free year-round.
FAQ
Q: How can I identify if my plants have a thrips infestation?
A: Thrips are tiny insects that leave distinct signs on your plants. You’ll notice silvery or bronze streaks on leaves, black dots of excrement, and distorted new growth. The leaves may appear speckled or have a stippled appearance due to the feeding damage. Thrips themselves are slender, measuring only 1-2mm long, and range from yellow to black in color. Shake a leaf over white paper to spot these fast-moving pests. Flowers may show brown edges or fail to open properly when thrips are present. Heavy infestations cause leaves to curl, turn brown, and drop prematurely from the plant.
Q: What are the most effective methods to eliminate thrips quickly?
A: Insecticidal soap or neem oil sprays work well for immediate thrips control when applied every 3-5 days for two weeks. Spray all plant surfaces thoroughly, including the undersides of leaves where thrips hide. Spinosad-based organic pesticides kill thrips on contact and provide residual protection. Blue or yellow sticky traps placed near affected plants capture adult thrips and reduce population spread. Pruning heavily infested leaves and disposing of them in sealed bags prevents thrips from migrating to healthy plants. A strong water spray can physically remove thrips from plant surfaces, though this method requires daily repetition. Systemic insecticides offer longer-lasting control for severe infestations but should be used as a last resort.
Q: Can I prevent thrips from returning after treatment?
A: Regular plant inspection helps you catch thrips before they establish large colonies. Keep your plants healthy through proper watering and fertilization, as stressed plants attract more pests. Quarantine new plants for at least two weeks before placing them near your existing collection. Remove weeds and plant debris around your garden since these provide hiding spots for thrips. Beneficial insects like ladybugs, lacewings, and predatory mites naturally control thrips populations when present in your garden. Reflective mulches confuse and repel thrips from landing on plants. Avoid over-fertilizing with nitrogen, which produces tender new growth that thrips prefer. Space plants appropriately to improve air circulation and make the environment less hospitable to these pests.